
You can use weatherstripping in your home to seal air leaks around movable joints, such as windows or doors. You may wish to seek a professional's help on this project, but if you are somewhat handy, these steps can help guide you.
To determine how much weatherstripping you will need, add the perimeters of all windows and doors to be weatherstripped, then add about 10% to accommodate any waste.
When choosing the type of weatherstripping to use, consider that the product can come in varying depths and widths. Choose a type of weatherstripping that will withstand the friction, weather, temperature changes, and wear and tear associated with its location.
Also note that windows have a large gap (about ¼" to ½”) on all four sides between the window sash and the framed opening. This is often a major source of thermal and air leakage that is hidden by window trim and/or wall finish.
For a significant impact on home performance, look for any opportunities to access this opening and fill it with non-expanding foam (expanding foam will compromise the operation of the window) to better seal any air leaks.
Sources: "Airtight Windows in 9 Steps," Josh Garskof, This Old House magazine; "Weather Strip Your Windows," Lowes.com.
PROJECT LEVEL
MODERATE
ENERGY SAVINGS
5 - 10 %
TIME TO COMPLETE
1 HOUR
OVERALL COST
$5 - $10
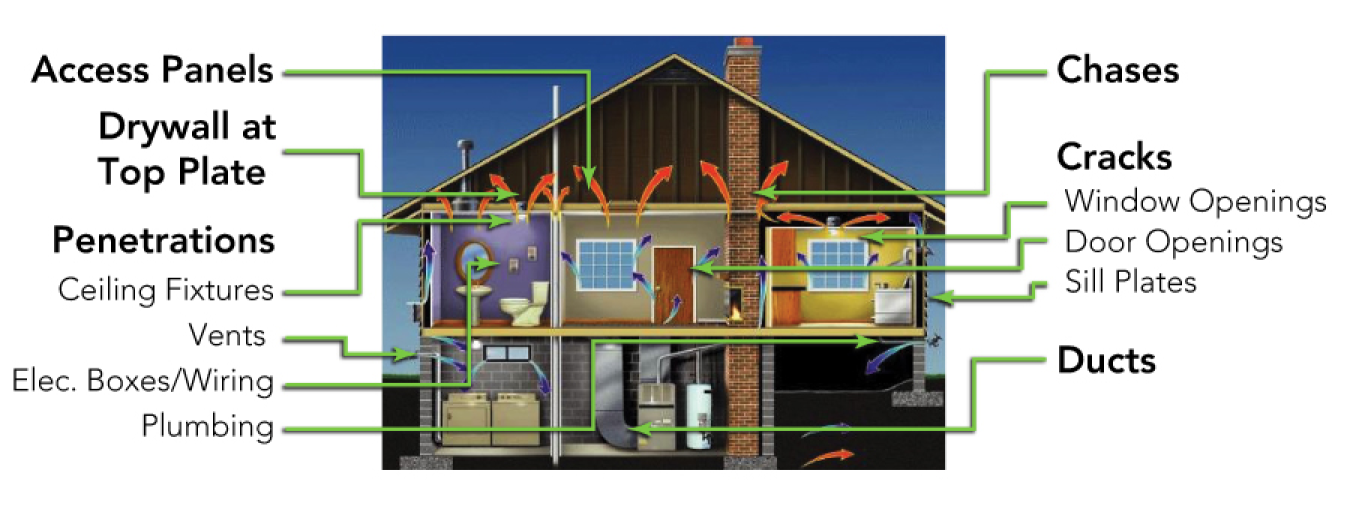
Look for air leaks in these common places in your home.
Before You Start
- Determine if a professional energy assessment is right for you.
- Detect air leaks in your home.
- Consider whether caulking or weatherstripping will better suit your needs.
- Determine whether you’ll be weatherstripping “double-hung” (sash) or “casement” type windows (which are hinged at the side and operated by a lever or crank to open inward or outward from a room).
Shopping List
- Self-adhesive foam insulation
- V-channel weatherstripping
- Utility knife
- Measuring tape
- Soap and water
- Finishing nails
- Hammer
Step-by-Step Instructions
-
Clean each edge that will be weatherstripped.
Clean the inside edges of the window frame and the bottom of the sash with soap and water. Make sure to let everything dry completely before moving on to the next step.
-
Before cutting any material, measure each side of the window–then cut.
Cut the V-strip material into two strips the length of the sash, plus an extra inch for each side. You’ll also need to cut strips for the bottom of the inner sash and the top of the outer sash.
-
Open up the window as far as you can.
-
Peel the backing off the V-strip (except for the extra 2 inches you left at the end).
Press the adhesive side of the strip to the inside of the window frame, in the groove that the sash fits into. Then fold the material over, and stick the extra inch (the part you left the backing on) up under the sash. Drive finish nails through the weather stripping into the jamb to hold it securely. Test the sash to ensure it doesn't catch on the nails.
-
Do the same on the opposite side of the jamb, and close the window.
-
Now that the window is closed, remove the backing from the extra inch of weatherstripping that should be sticking out.
Press the adhesive in place.
-
Lower the outer sash as far as it will go.
Install the weatherstripping the same way you did on the inside sash–again on both sides of the window. Apply the weatherstripping to the top of the outer sash, as well.
-
Put the outer sash back in place. Open the lower sash once more, and install the weatherstripping on the bottom edge.
The V should open facing up so the material condenses when the window is closed.
Subscribe to receive updates from Energy Saver, including new blogs, updated content, and seasonal energy saving tips for consumers and homeowners.